Friday, February 29, 2008
2/29/08 - Lesson 1 Flash
Today I finished Lesson 1 in Flash. I learned about creating keyframes using the F6 command, using the transform panel to rotate images, using the Property inspector to change the size and position of images, using the Motion option from the Tween menu (located in the Property inspector), using/selecting tools and hidden tools, using the color picker, undoing steps using 'Undo' or the History panel, previewing your movie (Control>Test Movie), and using Flash Help. This relates to TEKS 6(a), describing the properties and characteristics of computer-related hardware and software, and 18(h), completing work according to established criteria.
http://misterbjerkeca.wordpress.com/ is Mr. Bjerke's blog address.
Thursday, February 28, 2008
2/28/08 - Flash - Lesson 1
Today I tried to do Lesson 1 of Flash, but for a very long time I could not drag the pour_bottle symbol onto the stage! Since I could not figure out how to do that, I couldn't get any farther than step 4 of the section called 'Adding an item from the Library panel'. Frustration! I began planning for the March 10th project, but eventually I figured it out - I didn't have the pour layer selected. I reached step 1 of 'Using motion tweens to animate an object'. From the small bit of Flash that I did get to work on, I learned about the Stage and Timeline on Flash, adding a new layer, and creating a keyframe (Insert>Timeline>Keyframe). This relates to TEKS 2(d), identifying and describing roles of computer technology, 6(a), describing the properties and characteristics of computer-related hardware and software.
Wednesday, February 27, 2008
2/27/08 - Lesson 12 & Flash
This part stayed the same...
This part was made part of the html file through Zoomify.
Today I completed Lesson 12 of Photoshop, which relates to TEKS 18(g), using time management techniques to develop and maintain work schedules and meet deadlines. Today I learned how to add interactivity to an HTML file by using Zoomify (file>export>zoomify). Also, I started working on Flash. I reached 'Getting to know the work area' (after step 5 on the back of the first page). So far, I have learned how to open files in Flash, and a bit about the setup of the work area.
Tuesday, February 26, 2008
2/26/08 - Lesson 12
Mr. Bjerke is marvelous! Anyway, today I worked on the last lesson of photoshop. I learned how to create animation for a webpage through Photoshop, which involved creating an animated GIF and using the Tween button to create transitions between different images in animation. I also learned how to animate a layer style and how to export HTML and images. I got to step 13 of page 402. Work today relates to TEKS 2(d), identifying and describing the roles of computer technology, and 2(e), using computer technology to record, analyze, present, and exchange information.
Thursday, February 21, 2008
Exam - Photoshop
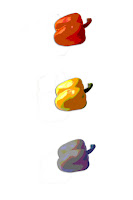
To create my own original Photoshop artwork from one of our Lessons, I opened the 04Working.psd through Adobe bridge. First, I saved a copy of this art (to my desktop, since my studenthome file is full). I then selected the Yellow Pepper layer, and used the Magnetic lasso tool to select the yellow pepper. I dragged copies of the pepper above and below the original pepper by using the Move tool to drag them while holding down Alt (in order to make a copy). I deleted all the other vegetables by selecting them with the Magnetic lasso tool, selecting their layer, and using the command 'Edit>Cut'. I then turned off the visibility of all of the vegetable layers except the Yellow Pepper layer and the Tomato layer. I then selected the highest pepper using, again, the Magnetic lasso tool. I chose the Paintbrush tool, set the opacity to 50%, and chose a red color, moving the brush back and forth in the selection to color the pepper (including the stem) red. I then did the same to the bottom pepper, except I used blue. I then decided that I did not want to include the tomato in my art either, so I turned off the visibility of the Tomato layer as well. I then chose the command 'delete hidden layers' from the Layers panel drop menu. At this point I had only one layer; Yellow Pepper. Then, one by one, I selected each pepper using the the Quick Selection tool and used the command Image>Adjustments>Posterize and set in the Posterize dialog box the red pepper to 5, the yellow pepper to 4, and the blue pepper to 6. I then used the Lasso tool to select and delete the leftover scraps. This completes the Andy Warhol-esque artwork!
Wednesday, February 20, 2008
2/20/08 - Lesson 11 cont. & Lesson 12
Before
Finished!
New Project - After
Today I finished Lesson 11 and got to page 394, step 1 of Lesson 12. Today I learned how to create a cutout effect using the Layer Style dialog box, match color schemes across an image using the Image>Adjustments>Match Color command. I also learned about slice symbols, creating a web design workspace, creating and selecting slices (which can be used to create buttons on a web page), and creating navigation buttons. This relates to TEKS 3(c), using graphic software to create and modify images, and 18(h), completing work according to established criteria.
Tuesday, February 19, 2008
2/19/08 - Lesson 11 cont.
Before
After
Today I reached page 372, step 4. Today I learned about hand-coloring selections on a layer, applying a blending mode and painting effects, changing color balance. I also got more practice with using filters and merging layers. Plus, I began learning to create a cutout effect in an image. My work today relates to TEKS 3(c), using graphic software to create and modify images, 6(a), describing the properties and characteristics of computer-related hardware and software, and 5(b), applying continuous quality control techniques to computer activities.
Monday, February 18, 2008
2/18/08 - Lesson 11
New project - after
Today I started Lesson 11. From my work on this day I got more practice with cropping images and creating guides which art will 'snap to', and learned how to 'automate a multistep task' (this consists of recording a new action set and then playing it on an individual file or batch-playing the action), and how to use smart filters. I worked up to page 356, step 8. This lesson has so far related to TEKS 3(c), using graphic software to create and modify images, 6(a), describing the properties and characteristics of computer-related hardware and software, and 7(b), following safety manuals, instructions, and requirements.
Friday, February 15, 2008
2/15/08 - Lesson 10 Finish
Before
After
Today I finished Lesson 10! I learned more about adding artwork in perspective (using vanishing point), adding an adjustment layer, using layer comps, and about flattening a layered image, merging layers/ layer groups, and stamping layers. My work relates to TEKS 18(h), completing work according to established criteria, 3(c), using graphic software to create and modify images, and 6(a), describing the properties and characteristics of computer-related hardware and software.
Thursday, February 14, 2008
Happy Valentine's Day, my child!
New Project: After
Haha! It is Valentine's Day!! Well, I am starting Lesson 10 today... I got to step 3 on page 326. Today I learned about clipping a layer to a shape using the layers panel, setting up a vanishing point grid through Filter>Vanishing Point, creating keyboard shortcuts, placing imported artwork (in this case, from Adobe Illustrator), filtering smart objects, and adding layer styles. This relates to TEKS 3(c), using graphic software to create and modify images, and 18(g), using time management techniques to develop and maintain work schedules and meet deadlines.Identifying, selecting, and sequencing proper computer resources to complete a project, TEK 6(b), will relate to the project that I'll start at some point...
Wednesday, February 13, 2008
2/13/08 - finishing Lesson 8
Wow - I have a lot to do. I'll be starting Lesson 10 tomorrow... I need to start working on the six weeks exam business and the March 10th assignment. Ahhh! Today I finished Lesson 8. I learned how to group layers into a smart object and how to warp this object, how to add vertical type, and how to delete annotation. Today's work relates to TEKS 3(c), using graphic software to create and modify images, 6(a), describing the properties and characteristics of computer-related hardware and software, and 18(h), completing his or her work according to established criteria.
2/12/08 - Competitive Testing
Gross! Anyway, I did not get to work on this day because of testing... This was not helpful to the goal that TEKS 18(g) emphasizes; using time management techniques to develop and maintain work schedules and meet deadlines.
Monday, February 11, 2008
2/11/08 - Lesson 8
After (See previous post's 'after' for before)
Today I worked on Lesson 8 again. I got to page 265, step 6. I learned about using interactive formatting controls, warping point type, and adding paragraph type from a sticky note. All of this relates to working with type and to TEKS 3(c), using graphic software to create and modify images, and 6(a), describing the properties and characteristics of computer-related hardware and software.
Friday, February 8, 2008
2/8/08 - Lesson 7 continued & Lesson 8
New section: Finished!
New Lesson: After
Today I finished Lesson 7! I learned how to correct image distortion using the Filter>Distort>Lens Correction command, how to create a PDF portfolio, and how to create a clipping mask from type. In Lesson 8 I reached step 2 in the section called 'Creating a design element from type'. My work today relates to TEKS 3(c), using graphic software to create and modify images, 6(a), describing the properties and characteristics of computer-related hardware and software, and 18(g), using time management techniques to develop and maintain work schedules and meet deadlines.
Thursday, February 7, 2008
Lesson 7 continued - 2/7/08
New Section: After
New Section: Finished
It's my sister's birthday! Well, on a more relevant subject, I started on a new section of Lesson 7 on page 224, step 1. Today, I learned about correcting making adjustments to shadows and highlights in an image, correcting red eye in a photo using the Red Eye tool, and 'reducing noise' in an image. (I also learned that red eye occurs when the retinas of a person's eyes are reflected by the camera flash - it often occurs in a darker room because the irises are open very wide. Plus, I learned the term 'image noise', which means random, extraneous pixels that are not part of image detail - there are 2 types, luminance noise - which causes grainy, patchy appearance - and color noise.) This relates to TEKS 3(c), using graphic software to create and modify images, and 2(d), identifying and describing the roles of computer technology.
Wednesday, February 6, 2008
2/6/08 - Lesson 7
Praise Mister Bjerke! He is so great! Haha! Luckily, Herr Bjerke said that as long as I knew what I did wrong on Lesson 6, I do not have to redo it... I am so ecstatic about this business. (I did not invert the garden mask, which made it so that it put in cyan-colored background over parts of the garden instead of the wooden border.) Well, anyway, today I was able to start Lesson 7. Today I learned about 'cleaning up' and enhancing digital photos (ex: removing red eye or brightening the image) using Photoshop. I learned to do this in Camera Raw in the first section. This work relates to TEKS 3(c), using graphic software to create and modify images, and 18(g), using time management techniques to develop and maintain work schedules and meet deadlines.
Tuesday, February 5, 2008
2/5/08 - Lesson 6 continued
Before
After
Well, today was exceedingly frustrating!!! I thought that I was finished with this particularly long lesson, but it turns out that something went horribly wrong in the early stages... which means I may have to start over!!!! ERRRR! (I somehow ended up with the blue stripes over the garden instead of the pieces of wood railing going across it.) I tried to fix it on my own, but have not been successful. I think I'll ask Mr. Bjerke for some help before I decide to start over... Anyway, some things I learned about today include altering the order of layers in Photoshop, copying layers, and, especially, the importance of inverting a selection which you make into a mask. My work today relates to TEKS 7(b), following safety manuals, instructions, and requirements, and, as this lesson is practice for creating a book cover, 2(d), identifying the roles of computer technology.
Friday, February 1, 2008
2/1/08 - Lesson 6 continued
Before
I know that it doesn't look closer to being done, but it IS.
On this day I progressed to page 198 - step 5. This lesson is taking longer than the other Photoshop ones, but I am getting closer to Lesson 7. (Hopefully I'll get to start that on Tues.) Well, today I learned more about working with layers and using masks... some specific things I learned include how to apply a gradient to a layer, how to view different layers in an image, and how to remove a background from an image using the the filter - extract command and highligher and eraser tools. This relates to TEKS 3(c), using graphic software to create and modify images, and 18(g), using time management techniques to develop and maintain work schedules and meet deadlines.
Subscribe to:
Posts (Atom)